
How to Choose Lip Liner Shade That Really Matches
You matched a brown lip liner to the online swatch, added your usual nude lipstick, and thought you'd found an affordable everyday combination. Then you checked it beside a window, and the outline looked grey. Learning how to choose lip liner shade starts with the color already on your lips, not the pencil's name or the model wearing it.
This post may contain affiliate links, which means I may receive a commission if you purchase through my links, at no extra cost to you. Please read the disclosure policy for more information.
If you're comparing affordable alternatives, these are dupe candidates to swatch, not guaranteed matches on every lip.
| Original to compare | Affordable dupe candidate | Check on your lips |
|---|---|---|
| Charlotte Tilbury Lip Cheat in Pillow Talk Original | NYX Slim Lip Pencil in Peekaboo Neutral | Pinkness and depth |
| M.A.C Lip Pencil in Cork | NYX Slim Lip Pencil in Nutmeg | Warmth and brown depth |
The One Rule That Gets Most Liner Shades Right
Match your liner to the deeper natural lip edge first, then decide whether you want a slightly deeper outline. That starting point avoids the most common mistake: choosing a nude that suits your complexion but looks pale, orange, or disconnected around your mouth.
Read the match in this order:
- Natural lip depth: How light or dark is the visible border?
- Lip undertone: Does that border lean rosy, mauve, peachy, brown, or balanced?
- Lipstick finish: Will the liner sit beside opaque color, translucent gloss, or a diffused stain?
Skin tone is the final check, not the foundation of the choice. Someone with fair skin can have a pronounced mauve border, while someone with a deeper complexion may have a rosier center and a dark brown perimeter.
Practical rule: For everyday definition, start with a liner about a shade deeper than your natural edge, in a compatible undertone. For an almost invisible outline, stay closer to the edge itself.
Rose, brown, and nude describe broad color families. They don't tell you whether a pencil contains enough pink, yellow, or grey to work against your own pigmentation.
The disclosure above is placed where you can notice it before considering purchases. The Federal Trade Commission's endorsement guidance says material commercial connections should be disclosed clearly and conspicuously.
Before choosing either a soft everyday pencil or a deeper contour shade, get a clear reading of your bare lip border.
How to Read Your Natural Lip Color Before Shopping
Natural lip color isn't neatly predicted by complexion. A 2024 natural lip-color study measured 410 healthy women aged 19–68 across Caucasian French, Caucasian American, African American, and Hispanic American groups, identifying 11 statistically distinct lip-tone groups with substantial overlap.
Use this visual guide to separate lip depth from undertone.
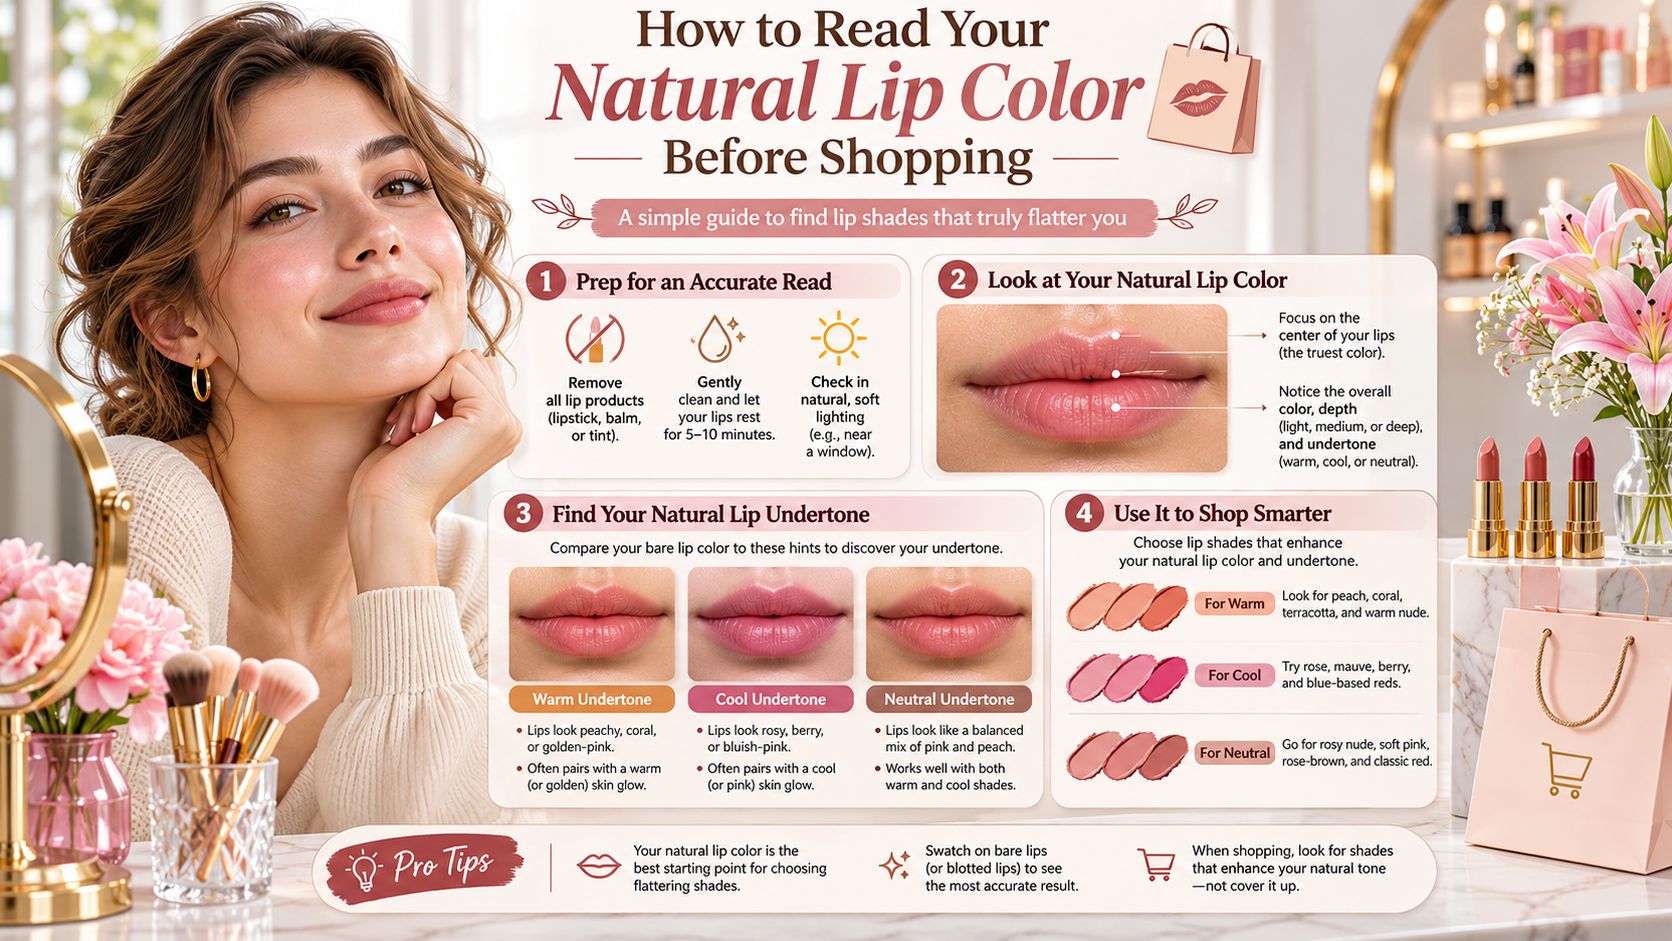
Make a Daylight Lip Note
Remove existing color and shine. Gently wipe off lipstick, tinted balm, and gloss, then let your lips settle after rubbing. Stand beside a window in indirect daylight with a hand mirror.
Find the deepest consistent border. Look along the outer edge, including the corners and upper lip. Don't use a tiny isolated dark spot or the palest part of the lower lip as your whole-mouth reference.
Describe the color cast. Rosy or berry-leaning lips suggest a cooler direction; peachy or cinnamon-leaning lips suggest warmth. Brown alone doesn't establish undertone, because brown borders can lean red, golden, or mauve.
Record uneven pigmentation. Note a darker upper lip, a deeper perimeter, or a lighter center. Dry surface patches can also interfere with what you see, so don't mistake flaky texture for your baseline color or assume you know the cause of a pigment change.
Use the border when the center is lighter. A pencil matched only to the center may create a pale line around a naturally deeper edge. Matching the perimeter gives you a more believable transition into lipstick.
Write a short shopping reference. Record lightness, undertone, and border variation in your phone. Use descriptions you can compare with a swatch, rather than writing nude.
A near-match in lightness gives subtle definition. A slightly deeper pencil adds structure, while a markedly lighter or more orange pencil can look separate from the mouth even when its packaging looks promising.
For a moving demonstration to accompany your mirror check, use the video below.
Keep the Reference Useful
You don't need a technical color measurement to shop well. You need a description that distinguishes your lips from the skin on your wrist and identifies where you want the liner to disappear.
Bring that note when comparing finish, undertone, and affordable alternatives. A useful example is:
Lip note: medium depth, cool rosy-brown undertone, darker upper border and lighter lower-lip center.
Liner Shade Picks for Every Lipstick Finish
| Lipstick finish or look | Liner shade approach | Why it works |
|---|---|---|
| Matte opaque | Same shade as lipstick or a step deeper | Helps control the edge and keeps opaque color defined |
| Satin or cream | Close to lipstick, slightly deeper | Adds shape without a hard outline |
| Sheer tint or gloss | Close to natural lip, or compatible muted brown | Translucent color leaves your own lip visible |
| Blurred or diffused | Neutral or cool near-match, edge softened | Avoids a sharp outline that fights the soft effect |
| Lip stain or stain layering | Compatible shade, tested after layering | Reveals the settled combination rather than the fresh swatch |
| Dark berry or brown | Same family or slightly deeper | Defines without a pale, ashy interruption |
Use the depth and undertone in your lip note as the starting point, then adjust for how much of your natural color the lipstick exposes. An opaque lipstick can carry a more lipstick-specific liner; a clear gloss can't hide a mismatch.
Opaque, Satin, and Deep Colors
With matte lipstick, a precise pencil close to the lipstick shade gives the cleanest result. A deeper liner can add contour, but blend it inward so the transition doesn't stop abruptly at the border.
For satin or cream lipstick, choose a softer difference in depth. These finishes reflect light and move more readily than a dry-looking matte, so a rigid, dark perimeter can look disconnected from the center.
Dark berry and brown lipsticks need particular care with pale nude pencils. Choose a related berry-brown, plum-brown, or cocoa direction instead of trying to make a light beige pencil work underneath.
If you're still choosing the lipstick itself, use our guide to choosing the right lip color before buying its companion liner.
Sheer, Blurred, and Stained Looks
With gloss or sheer tint, the liner remains highly visible through the finished look. Blend toward the center with a small lip brush, and only choose muted brown when it belongs with your natural pigmentation.
A blurred lip needs a softened boundary, not simply a crisp outline covered with balm.
A neutral or cool near-match can work well for a diffused effect, but don't force a cool pencil onto distinctly warm lips. Use light pressure and soften the edge before adding the central color.
Stains deserve their own check. The Hollywood Reporter's beauty-trend coverage cites 2026 forecasts of 38.6% year-over-year growth for lip stains and 36.0% for lip-liner stains. Those are projections, but they highlight why hybrid formats shouldn't be treated like ordinary pencils.
Let the stain develop according to its directions, then assess it with the intended lipstick or gloss. When unsure, match the lipstick's depth and reduce outline contrast, rather than assuming a deeper pencil will improve every finish.
Match Your Liner to Skin Tone and Undertone
| Skin tone and undertone | Liner shades that tend to work | Shades to be cautious with |
|---|---|---|
| Fair, cool | Rose, mauve, cool berry | Orange-brown or warm tan |
| Fair, warm or neutral | Soft pink-brown, muted rose | Ashy grey-brown or cool plum |
| Medium, warm | Warm brown, caramel-rose, terracotta | Icy pink or grey taupe |
| Medium, cool | Mauve-brown, rosewood | Strong orange-brown |
| Deep, warm | Rich cocoa, warm brown | Pale nude or washed-out taupe |
| Deep, cool | Plum-brown, deep berry | Ashy grey |
Treat these families as starting points, not restrictions. Your lip note can override a complexion-based suggestion, especially when your natural border is deeper or cooler than the rest of your face.
A 2017 experimental study of lip color and facial perception found in its first experiment that redder lips made surrounding facial skin appear lighter, while darker lips made it appear darker. That finding doesn't prescribe a flattering shade, but it explains why a pencil can look balanced in a close-up and unexpectedly strong when you step back.
Judge the Whole Face
A rosier liner may give you the brighter-looking balance you want. A deep cocoa or plum perimeter may make the mouth more prominent. Neither effect is automatically wrong; the question is whether it suits your intended makeup.
Hold your mirror at a comfortable distance and include your cheeks, chin, and eyes in the assessment. Don't judge only the small strip of color at the lip border.
If warm and cool still feel unclear, our explanation of what undertone means in makeup helps separate underlying color direction from surface skin depth.
Why a Deeper Nude Can Look More Natural
The most useful nude isn't necessarily slightly darker than your skin. For pigmented lips, it may need to be browner, rosier, or deeper than a complexion chart suggests.
The Bangstyle nude lip-liner guide supports using the natural lip edge as a matching reference. In practice, that distinction matters most when the center and perimeter aren't the same color.
- If beige looks chalky: Try more depth before abandoning nude shades.
- If taupe looks grey: Compare a rosier or less muted option.
- If brown looks orange: Look for less golden warmth, not automatically a much darker pencil.
Cool, warm, and neutral labels are useful filters, but they aren't a substitute for seeing the finished face. Keep the table flexible enough to accommodate your actual lips.
Test and Verify Your Liner Before Checkout
A hand swatch can help compare texture and broad color direction. It can't tell you whether a pencil will merge with your lip border, so make the purchase decision from a wearable pairing, not a row of wrist swatches.
Run the Shade and Label Checks Together
Apply the candidate hygienically. Use your own pencil or an appropriately prepared sample, not a communal tester directly on your mouth. Put liner on part of the border beside your lipstick, then complete the intended combination if the initial match looks promising.
Inspect in indirect daylight. Check at arm's length, then take in the full face. Avoid relying on a brightly lit magnifying mirror, which makes a small contrast look more important than it is in ordinary conversation.
Take an unfiltered phone photo. Keep beauty filters off and compare the image with your reflection. If the camera shifts the color, trust the in-person daylight assessment rather than editing the photograph until it looks right.
Apply a clear pass-or-fail test. For a blended look, the edge should read as an extension of the lip, with the lipstick remaining the main color. Fail the pairing if it turns conspicuously grey or orange, or leaves an unwanted ring as the center wears away.
Retest a nearby option. Move closer to the natural edge in depth or undertone before jumping to a completely different family. If orange is the problem, choosing a darker orange-brown won't solve it.
Compare the description and formula with your note. A creamy pencil is easier to diffuse; a firmer pencil can make precision easier. Choose according to your technique, and don't assume a long-wear or stain formula will blend like a conventional pencil.
Confirm intended lip use. The FDA's color-additive guidance explains that cosmetic color additives must be approved for their intended use, and some also require batch certification. A similar-looking eye pencil isn't automatically an appropriate substitute.
Buy the successful pairing, not extra possibilities. If stain layering with matte lipstick is a regular part of your routine, an edge-matching shade and a slightly deeper companion can be useful. Start with the one that passed; add the other only when it serves a distinct look.
Affordable Dupe Candidates to Compare
These familiar US-market options are useful comparison candidates, but shade similarity doesn't establish identical texture, wear, or performance.
NYX Slim Lip Pencil in Peekaboo Neutral for Charlotte Tilbury Pillow Talk Original. Compare the pinkness against your bare border. Reject the swap if the affordable pencil becomes noticeably brighter or lighter than the effect you wanted.
NYX Slim Lip Pencil in Nutmeg for M.A.C Cork. Compare warmth and depth with the lipstick you wear. A brown that works under an opaque nude may look much stronger under clear gloss.
For a less golden brown direction, use our cool-toned brown lip liner guide to narrow your comparisons. Keep your lip note and daylight photos together today, so your next purchase starts with evidence rather than another appealing shade name.
Frequently Asked Questions About Lip Liner Shade
Should Lip Liner Be Darker Than Lipstick?
A slightly deeper liner works when you want definition, but it isn't compulsory. Choose the same shade or a close match for a blended finish, and soften the perimeter for a blurred look.
With very pale lipstick, a much darker border creates deliberate contrast rather than an invisible enhancement. Blend the junction inward if that's the effect you want.
Why Does My Liner Look Grey or Orange in Daylight?
The pencil's depth, undertone, or muted quality may be wrong for your lip pigment. Grey can indicate an overly pale or ashy choice; orange can indicate more golden warmth than your lips support.
Use your lip note to identify the direction of the mismatch. Adjust that variable instead of repeatedly buying different pencils carrying the same nude label.
Can Liners With the Same Shade Name Match?
Not reliably. Rosewood, nude brown, and mauve aren't standardized color specifications across brands, and a sheer pencil can look different from an opaque pencil even when their swatches initially seem similar.
Compare the applied color, blendability, and settled finish. A useful dupe reproduces the result you want, not merely the wording on the barrel.
Can I Use a Liner That Isn't Labeled for Lips?
Don't substitute a pencil labeled only for another area. The FDA's color-additives fact sheet explains that permission for externally applied cosmetics doesn't automatically permit use on lips.
The FDA's cosmetics contaminant guidance reports typical color-additive impurity limits of no more than 3 parts per million arsenic, 20 parts per million lead, and 1 part per million mercury. These aren't blanket finished-product limits or a way to judge safety by color; choose a product intended for lips and use it according to its directions.
Wrap Up and Final Shade Check
Start with the deeper natural lip edge, record its depth and undertone, and choose the outline according to your lipstick's finish. Use complexion as the final balance check, then verify the actual pairing in daylight before buying.
For a soft pink-nude result, NYX Peekaboo Neutral is the dupe candidate I'd test first against Pillow Talk Original, not a universal winner. Nutmeg is the more relevant comparison when your target is a warmer brown effect like Cork.
The best everyday shade is often slightly deeper than your natural border, but neither a shade name nor a brand comparison proves a match. Bring your lip note on your next shopping trip and buy the pencil that works on your mouth.
Finding Favourites offers affordable beauty alternatives and practical guides to help you compare shade, texture, and finish before spending. Visit Finding Favourites to explore budget-friendly swaps, and keep your daylight lip note beside you when choosing your next liner.