
How to Contour for Beginners: Your 2026 Guide
If you're here because contour tutorials have made you feel like you need a geometry degree, a ring light, and six different sticks just to define your cheekbones, I get it. A lot of beginner makeup advice makes contouring look way more complicated than it needs to be. The good news is that a flattering contour doesn't come from drawing stripes all over your face. It comes from placing a little shadow in the right spots, blending well, and stopping before it starts to look obvious.
That's also why contour has stuck around. It moved from niche makeup artistry into a mainstream beauty technique through the 2010s, especially as social-media tutorials made it more visible and beginner-friendly, and by the mid-2010s major brands were already publishing easy consumer guides instead of treating it like a pro-only skill, as noted in Max Factor's how to contour and highlight tutorial. If you're also curious about the bigger beauty conversation around definition and lift, this guide to the benefits of face sculpting gives helpful context on why so many people like subtle structure-enhancing routines in the first place.
This post may contain affiliate links, which means I may receive a commission if you purchase through my links, at no extra cost to you. Please read the disclosure policy for more information.
Welcome to Your Easiest Contour Ever
Contouring for beginners works best when you stop thinking about transformation and start thinking about gentle definition. You're not trying to carve out a new face. You're just mimicking the soft shadows that already exist under your cheekbones, around your jaw, and beside your nose.
That shift matters because most contour mistakes come from overdoing it. Beginners usually struggle for one of two reasons. Either they use too much product, or they place it too far toward the center of the face. Both make contour look heavy fast.
Big mindset shift: The best beginner contour is the one nobody can clearly detect. People just notice that your makeup looks polished.
A good routine should feel manageable on a regular morning. If it only works when you have an hour to spare, it's not beginner-friendly. The version worth learning is the one you can do half-awake with a decent mirror, one brush, and a light hand.
Here's the part I wish more tutorials said plainly:
- You don't need a full sculpting kit to learn.
- You don't need every face chart on social media.
- You don't need dramatic lines before blending.
- You do need placement, restraint, and patience.
That's what this guide focuses on. You'll learn where contour goes, how to blend it so it looks expensive, and which affordable products are worth buying first.
Choosing Your Contour Tools and Products
The product matters, but not as much as choosing a formula you'll enjoy using. For beginners, the easiest contour product is the one that gives you enough playtime to blend before it sets and enough control that you don't end up with a muddy patch.
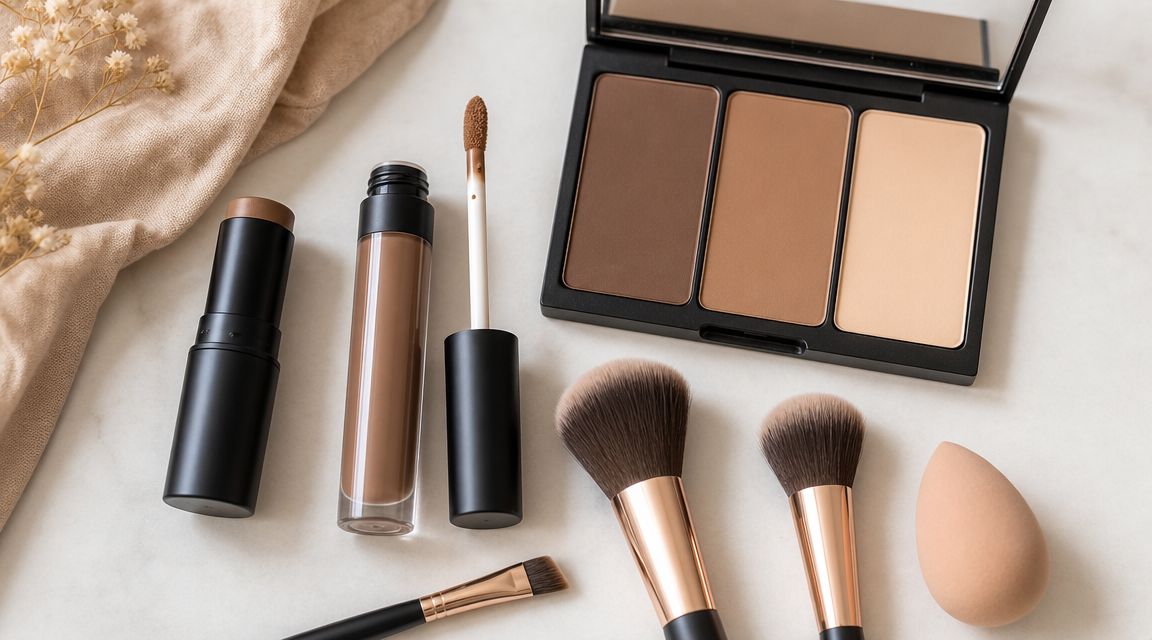
Cream, liquid, and powder
Cream contour is usually the most forgiving. It blends beautifully, looks skin-like, and works especially well if you prefer a natural finish. Sticks are great for control because you can place product exactly where you want it.
Liquid contour can look well-blended, but it can also get messy fast if the formula is very pigmented. If you're brand new, apply it to the back of your hand first, then pick it up with a brush instead of dotting a lot directly onto your face.
Powder contour is the easiest choice if your skin gets oily or you already love powder makeup. It layers well over foundation that's been set, and it's often easier to keep soft because powder diffuses naturally.
Contour is not bronzer
This is the beginner mix-up that causes most of the “why does my contour look orange?” frustration.
- Contour should create the look of shadow, so a more neutral or cooler tone tends to work better.
- Bronzer adds warmth and sun-kissed color, so it usually sits in a different lane.
You can wear both. In fact, that often looks the most balanced. Contour shapes. Bronzer warms. If you want a separate bronzer that won't overwhelm lighter skin, this roundup of the best drugstore bronzer for fair skin is a useful place to compare options.
The tools that make blending easier
A beginner doesn't need a giant brush collection. A small setup works.
- Angled brush: Great for cheek and jaw contour because it follows the line of the face.
- Dense buffing brush: Better than a huge fluffy brush when you want control.
- Sponge: Helpful for softening edges after your initial blend.
- Small detail brush: Handy for nose contour if you want extra precision.
If you're working with heavier coverage makeup or spot correction, pairing contour with high-quality camouflage products can help you keep the rest of the complexion polished without piling on layer after layer of base product.
Use a tool that matches the size of the area. Big fluffy brushes make small placement mistakes spread everywhere.
Contour Mapping for Your Unique Face
Most beginners get overwhelmed by face-shape diagrams because they seem to suggest there's one correct map for round faces, another for oval, another for square, and on and on. In real life, contour placement gets easier when you follow your own natural shadow map.
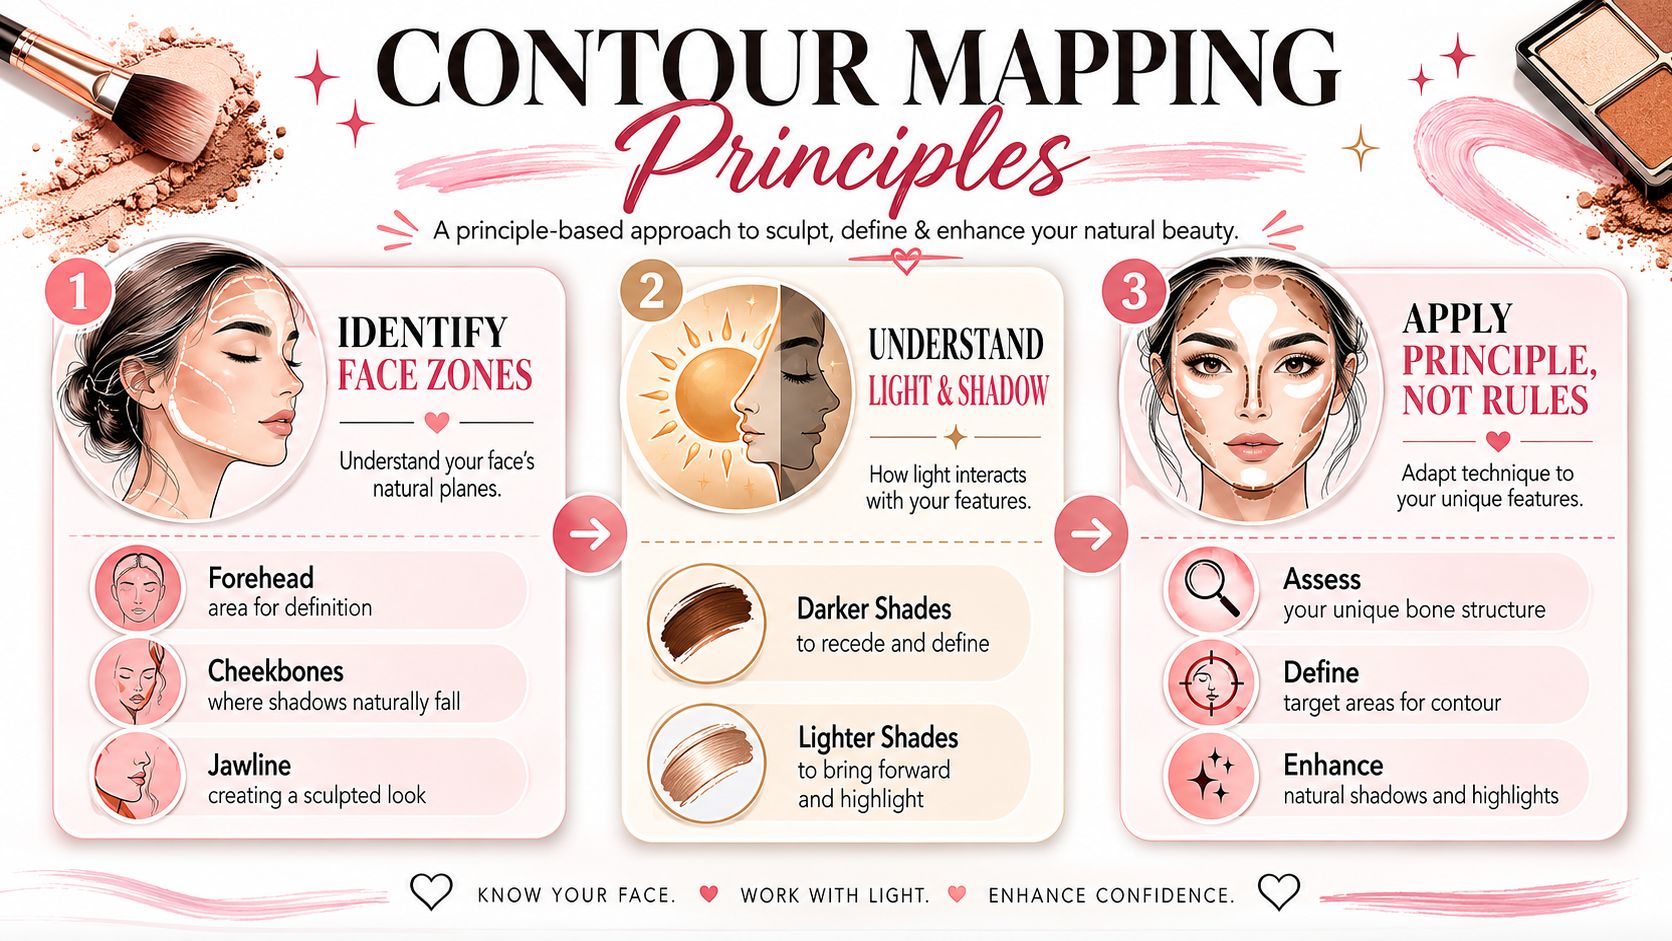
According to Ipsy's beginner guidance on how to contour, placement is most reliable when it follows natural shadows: under the cheekbone from the mid-cheek toward the ear, along the hairline, under the jawline, and in two slim lines on each side of the nose. The same guidance stresses keeping placement close to the perimeter of the face and blending until it reads like shadow instead of visible stripes.
Find your cheek contour zone
The best cheek contour usually sits under the cheekbone, not directly on the fullest part of the cheek. A simple way to find it is to feel for your cheekbone and place the contour just beneath it, starting nearer the outer face and keeping the line relatively lifted.
If you bring that line too low, it can drag the face downward. If you bring it too close to the mouth, it can look muddy. Stay on the outer half first. You can always add more.
Keep the rest close to the edges
Forehead contour works best near the hairline. Jaw contour should sit underneath the jaw, not smeared across the chin. Nose contour looks more believable when the lines are slim and soft rather than dark and dramatic.
That “stay near the perimeter” rule is one of the simplest ways to make beginner contour look better immediately.
Here's a quick placement cheat sheet:
| Area | Where to place it | What to avoid |
|---|---|---|
| Cheekbones | Just under the bone, sweeping outward | Bringing it too low |
| Forehead | Along the hairline | A dark band across the center |
| Jawline | Under the jaw | A thick stripe on the chin |
| Nose | Slim lines at the sides | Wide, dark lines |
Your undertone still matters
The right depth is important, but so is the tone of the product itself. If your contour keeps turning ashy or oddly warm, it might not just be the formula. It may be your undertone clashing with the shade. If you're not sure what flatters you most, this guide on how to identify your undertone makes shade selection much easier.
A contour map should adapt to your features, not force your features into a diagram.
Your Stepwise Application and Blending Guide
The easiest way to learn how to contour for beginners is to separate the technique into two routines. One for cream or liquid. One for powder. The placement stays similar, but the order changes.
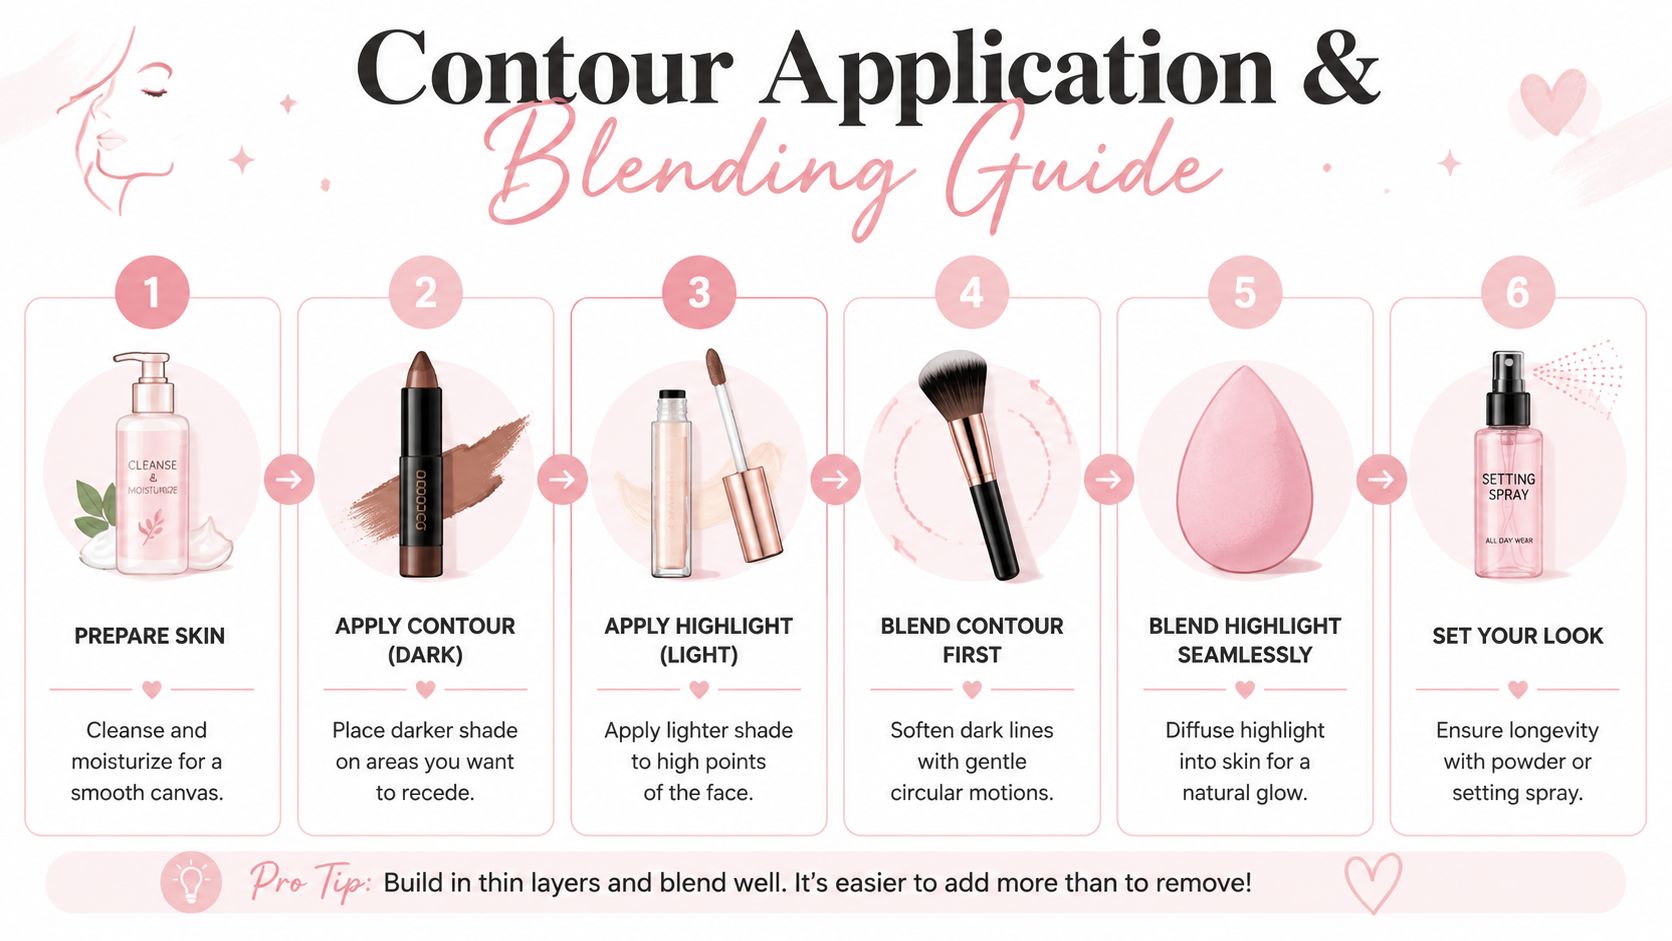
Anastasia Beverly Hills notes in its beginner guide to using a contour stick that a practical routine typically targets just 4–5 zones: the sides of the nose, under the cheekbones, the jawline, and sometimes the forehead or hairline. The most important beginner rule is to use less product first and build gradually.
Cream and liquid routine
If you're using stick or liquid contour, keep your base slightly tacky or fresh. Cream products usually blend best before heavy powder sets everything in place.
Prep your skin
Apply skincare, then your base. Foundation or skin tint is fine. You don't need full glam to contour.Place a small amount
Add contour to your chosen zones. Keep each placement short and controlled.Blend the contour first
Use a dense brush or small sponge. Start where you placed the deepest part, then soften the edges outward and upward.Add highlight or concealer after
Once the contour is blended, brighten where you want lift.Set only where needed
If you get cakey easily, don't powder the entire face aggressively.
A lot of beginners improve fast when they see the motion in action, so this quick demo helps make the blending pattern easier to understand:
Powder routine
Powder contour behaves differently. It needs something to grip, but not a wet cream underneath that hasn't settled.
- Apply your foundation first
- Set lightly if needed
- Pick up a small amount of powder contour
- Tap off excess
- Build slowly in thin layers
Powder often looks best when you press lightly at first and then diffuse. If you swirl a lot of product onto the brush immediately, you'll get that dusty stripe effect.
The blending technique that actually works
A pro tutorial on YouTube advises using a small, controlled amount of product and a brush that isn't overly fluffy. It also specifies a brush roughly three times the width of the drawn contour line, then blending in circular or upward motions so you soften edges without losing structure, as shown in this professional contour blending tutorial.
That tip is gold because it solves two common beginner problems at once. A tiny brush can leave harsh edges. A huge fluffy one can erase all the definition you just created.
If your makeup tends to bunch up or look heavy as you layer products, this guide on how to make makeup less cakey can help you troubleshoot the base underneath your contour too.
A clean finish checklist
Before you call it done, check these in daylight if you can:
- Cheeks look lifted: not dragged downward
- Edges look blurred: not striped
- Nose contour looks soft: not sketched on
- Jaw contour disappears into the skin: not sitting on top
Blend until it looks like a shadow you were born with, then stop.
5 Affordable Contour Dupes That Look Expensive
You do not need luxury contour to get a polished result. Good contour is mostly about shade choice, texture, and how easy the formula is to blend. A smart dupe lets you practice more, spend less, and figure out what formula style you prefer before investing in anything pricier.
Luxury Contour vs Affordable Dupes
| Luxe Product | Affordable Dupe | Best For |
|---|---|---|
| Charlotte Tilbury Hollywood Contour Wand | e.l.f. Halo Glow Contour Beauty Wand | Easy liquid contour |
| Fenty Beauty Match Stix Contour Skinstick | NYX Wonder Stick | Quick cream sculpting |
| Milk Makeup Sculpt Stick | e.l.f. Putty Bronzer | Creamy, soft-focus definition |
| Anastasia Beverly Hills Contour Stick | Makeup Revolution Fast Base Contour Stick | Beginner stick contour |
| Kevyn Aucoin The Sculpting Powder | NYX Sweet Cheeks Matte Blush in a contour-like tone or a cool-toned powder contour from e.l.f. | Powder contour lovers |
1. e.l.f. Halo Glow Contour Beauty Wand
If you love the idea of the Charlotte Tilbury Hollywood Contour Wand but not the spend, this is the dupe I'd point most beginners toward first. It has that easy liquid-wand format that gives a softly sculpted effect without looking stiff on the skin.
Why it works:
- Beginner-friendly texture that blends fast
- Natural finish that doesn't scream contour
- Easy placement with the cushion tip
The trade-off is that wand packaging can dispense more product than you need. Dab lightly.
2. NYX Wonder Stick
This is the practical dupe for anyone drawn to the Fenty Match Stix idea but wanting a simpler, widely available drugstore option. You get contour and highlight in one product, which removes some of the decision fatigue.
Best if you want:
- cream formula
- fast routine
- one-and-done packaging
It's especially handy if you're still learning placement and don't want a full kit.
3. e.l.f. Putty Bronzer
This one sits in that useful in-between space. It isn't always a textbook cool contour on every skin tone, but for beginners who want soft cream definition and a more forgiving texture, it can mimic the vibe of pricier cream sculpting products like the Milk Makeup Sculpt Stick.
The payoff is soft rather than severe, which is often exactly what a beginner needs.
4. Makeup Revolution Fast Base Contour Stick
If you like the direct placement style of the Anastasia Beverly Hills Contour Stick, this is one of the easiest budget swaps to test. Stick formulas help a lot when you want precision on cheeks, forehead, and jaw without fussing with liquid drips.
Good points:
- Precise application
- Travel-friendly
- Easy to blend with a dense brush
Potential downside: some stick formulas work best on a well-prepped base, so don't skip moisturizer.
5. Cool-toned powder options from NYX or e.l.f.
For the Kevyn Aucoin powder-contour fan, the affordable route is usually less about a perfect one-to-one dupe and more about finding a matte, cool-toned powder that creates believable shadow. NYX and e.l.f. both have accessible powder options worth checking depending on your skin tone and preferred finish.
For oily skin or anyone who likes a more polished, set complexion, powder contour can be the easiest budget category to shop.
Best overall beginner dupe: e.l.f. Halo Glow Contour Beauty Wand. It's easy, flattering, and gives that soft sculpted look people usually want from higher-end contour.
Common Contour Mistakes and Quick Fixes
Contour usually goes sideways for one of three reasons: the shade is off, the placement is off, or the blend is rushed. The good news is that beginners can fix all three without starting over or buying a luxury product.
A lot of expensive-looking contour comes down to correction, not perfection on the first pass.
When contour goes wrong
Too warm or orange
The face starts looking bronzed instead of sculpted. Switch to a more neutral or cool-toned shade next time. If it is already on, tap a little foundation, concealer, or skin-tone powder over the top to mute the warmth.Cheek contour placed too low
Low placement can drag the face down and make the cheek area look muddy. Use a clean brush or sponge to blend the lower edge upward. If needed, sharpen the area above it with a touch of concealer rather than adding more contour.Harsh lines that stay visible
This usually means too much product, a formula that set too fast, or a brush that is too small and dense for the amount applied. Work a tiny bit of base product over the edges, then press with a sponge. For next time, professional makeup artist Lisa Eldridge shows a softer, diffused approach in her contour tutorial for natural definition.Contour looks dirty by the end of the blend
The shade may be too dark, or the product was spread too far inward. Keep contour closer to the outer face and build slowly. One small placement mistake is easier to fix with an affordable dupe than a full stripe of product that keeps growing.
Fast rescue moves
If the contour looks heavy, fix the edges first.
- Press over it with your makeup sponge using whatever foundation is left on it.
- Add base around the contour, then blend inward so the darkest part stays subtle.
- Set with a little face powder if cream products keep grabbing and looking patchy.
- Stop before adding bronzer or blush if the sculpt already looks strong.
Shimmer is another common mistake. Contour should read like shadow, so matte or near-matte formulas usually look more believable. If a budget product is the only one you have, a soft powder on top can tone down extra shine and make it look more refined.
One more trade-off to know: highly pigmented contour sticks can seem like a better value, but they are often less forgiving for beginners. A slightly sheerer dupe is usually easier to control, easier to blend, and much more likely to give that polished high-end finish.
Contouring FAQ and Final Thoughts
Can I use bronzer to contour?
Sometimes, but it won't give the same effect. Bronzer adds warmth. Contour creates shadow. If your bronzer is very warm, it can make the face look sun-kissed rather than sculpted.
Which contour formula is best for beginners?
Cream sticks and forgiving liquid wands are usually easiest if you want a natural look. Powder is a great choice if your skin is oily or you prefer a more set finish.
How do I choose a contour shade?
Look for a shade that appears more neutral or slightly cool rather than obviously orange. The right depth depends on your skin tone, but the overall effect should look like a shadow.
Do I need to contour every part of my face?
No. Most beginners look better contouring only the areas that make the biggest difference, usually cheeks and maybe the forehead or jawline.
The biggest lesson with how to contour for beginners is simple. Place product sparingly, keep it near the outer structure of the face, and blend with intention. If you want the easiest affordable starting point, e.l.f. Halo Glow Contour Beauty Wand is the best all-around dupe in this list because it gives a polished, high-end look without making the learning curve steeper. Start subtle, practice a few times, and your contour will get better very quickly.
If you love beauty finds that give you the luxury look without the luxury price, Finding Favourites is worth bookmarking. It's packed with smart dupe roundups, practical makeup guides, and budget-friendly picks that make shopping a lot easier.