
10 Chic White Christmas Nail Designs for 2026
Dreaming of a White (and Chic) Christmas Manicure? If you love festive nails but don't want the usual red glitter overload, white is the answer. It looks polished, wintery, and expensive even when you're working with a drugstore budget. It also fits more situations. Office party, family dinner, New Year's brunch, gift wrapping on the couch. A good white manicure works for all of them.
That's a big reason white Christmas nail designs have taken off as a mainstream festive style, with looks ranging from simple milky whites to snowflakes and chrome finishes, and with white standing out for its clean appeal and versatility across outfits and events, as noted by Glamnetic's 2025 white Christmas nails roundup. The best part is that you don't need a salon appointment to pull them off. With the right white polish, a steady top coat routine, and a few easy techniques, you can get a chic holiday set at home for much less.
This post may contain affiliate links, which means I may receive a commission if you purchase through my links, at no extra cost to you. Please read the disclosure policy for more information.
If you're also setting the holiday mood at home, pair your manicure night with these luminous holiday candle displays.
1. Classic White with Silver Snowflakes
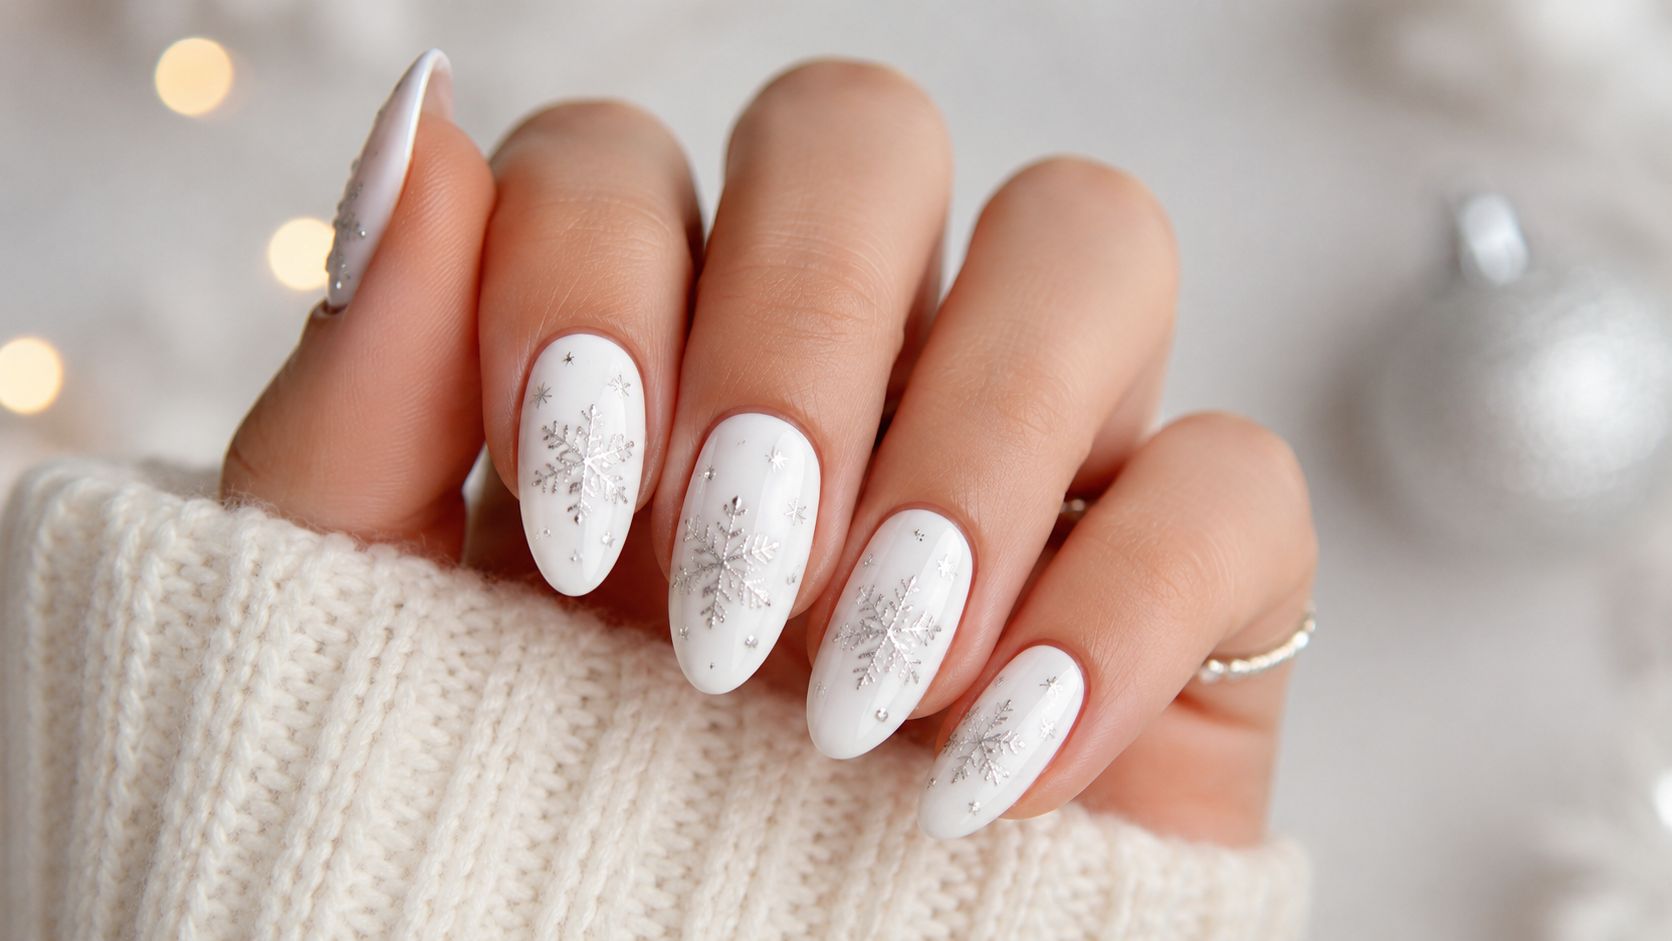
If you want one design that almost never looks dated, start here. A crisp white base with fine silver snowflakes gives you that holiday feel without sliding into novelty territory. It looks especially good on almond and oval nails, but it also works on short squoval nails if you keep the snowflakes small.
For the base, I'd use Essie Blanc if you want strong coverage fast. A good dupe option is Sally Hansen Insta-Dri White On Time when you want a brighter white and quicker dry-down. For the silver detail, SinfulColors Out of This World or a thin silver nail art pen is easier for beginners than freehanding with a regular brush.
How to do it at home
Paint two thin coats of white, then let them set longer than you think you need. White polish drags easily if you start nail art too soon. Use a dotting tool for the center of each snowflake, then pull out short lines with a toothpick or detail brush.
- Best for beginners: Use a stamping plate or snowflake stickers if your non-dominant hand is shaky.
- Most flattering placement: Put the snowflakes on two accent nails and keep the rest plain white.
- Best top coat move: Float top coat over the art instead of pressing the brush down, so you don't smear the silver.
Practical rule: If your white base looks streaky after coat one, don't fix it by piling on a thick second coat. A third thin coat is safer and usually looks smoother.
This style fits right in with the cool-toned shades featured in these winter nail colors.
Difficulty: 2.5/5
2. Snowy White Ombré with Glitter Gradient
You want holiday nails for a week packed with errands, parties, and dishwashing, and you do not want every tiny chip to show by day two. This is the white Christmas design I reach for in that situation. A milky white fade with a concentrated silver glitter tip looks soft, expensive, and much easier to maintain than a crisp full-white manicure.
Skip the stark white here. A sheer or jelly-leaning white blends better and gives beginners more room to work. Essie Marshmallow is a reliable pick, and Olive & June HD gives a similar softened look. For the glitter, LA Colors Color Craze Diamond Crush is one of the better budget options because the particles are fine enough to fade upward cleanly. Sally Hansen Insta-Dri Sprinkle Twinkle also works if you want a little more shine.
How to do it at home
Apply one or two thin coats of your soft white base. Then paint glitter onto a makeup sponge and press it onto the tips, keeping most of the sparkle at the free edge. On the second pass, stop slightly lower on each nail so the fade stays gradual. Finish with a glossy top coat to smooth the texture and blur the transition line.
This style earns its spot because it is practical. The glitter at the tips helps hide wear, and the softer base is much more forgiving if your white polish is not perfectly even. If I am helping a beginner choose between solid white and this, I usually point them here first. It gives the same winter feel with less cleanup and fewer visible mistakes.
- Best budget combo: Essie Marshmallow + LA Colors Diamond Crush
- Best beginner tip: Use a torn wedge sponge, not the polish brush, for the gradient
- Best glitter type: Fine shimmer or micro-glitter. It diffuses better than chunky pieces
- Skip this: Thick glitter coats straight from the bottle. They usually leave gaps and raised spots
Money-saving tip: If you already own a silver glitter topper that looks sparse, do not replace it yet. Sponging it on makes even a cheap formula look denser and more polished.
Difficulty: 2/5
3. Modern Matte White with Gold Lines
Matte white can look editor-approved or chalky. The difference is prep. If the nail surface is uneven, matte top coat will spotlight every ridge and bump. If the base is smooth, the finish looks velvety and expensive.
For this one, go with a creamy white like OPI Alpine Snow or Essie Blanc. Then use a matte top coat such as Essie Matte About You. For the gold detail, a striping tape works, but a gold nail art liner is faster if you don't want to fuss with tweezers.
Keep the lines simple
One vertical line near the sidewall looks modern. A tiny diagonal slash near the cuticle also works. Don't crowd every nail. Matte white already has presence, so the gold should feel like jewelry, not wrapping paper.
Matte top coat softens shine, not mistakes. Buff ridges first, cap the tip, and let the white dry fully before mattifying.
I like this on shorter nails because it looks crisp and grown-up. If you're doing this for a holiday dinner, pair it with gold rings and leave the rest of the look minimal. It doesn't need much else.
Difficulty: 3/5
4. Cozy Sweater Weather Knit Nails
You pick a cozy white knit manicure for a holiday weekend, then realize halfway through that regular polish turns the pattern into a lumpy mess. That usually happens because sweater nails need height, and height is much easier to control with gel or press-ons than with a standard lacquer manicure.
If you want this look at home without wasting money, start with short white press-ons or a cured gel base instead of building everything on natural nails. Kiss Bare but Better works well if you want a soft, wearable base. Plain white press-ons are even easier because you can paint the raised pattern before application. For the sweater detail, a thick white gel liner such as Beetles White Gel Liner gives you cleaner texture than a thin striping polish.
A beginner-friendly way to do it
Keep the knit pattern on one or two accent nails. Ring fingers are the safest choice. Paint the rest of the set in a flat white so the textured nails stand out and you do not have to spend an hour repeating the same cable pattern ten times.
Draw one vertical cable line down the center, then add short diagonal strokes on each side to mimic a braided sweater. Cure each line before adding the next one. That step matters. If you stack wet gel all at once, the design spreads and loses the raised effect. If you only have regular polish, skip the full 3D look and fake it with fine white lines over a glossy white base.
A light dusting of loose white glitter or acrylic powder over uncured gel gives the pattern that soft, snowy finish. Brush off the excess after curing.
- Best base option: White or milky press-ons
- Best drugstore-style combo: Kiss press-ons plus a white gel liner
- Best beginner shortcut: Do sweater texture on accent nails only
- Skip this if: You need a quick manicure the night before an event
I recommend this design most for weekends, casual holiday parties, and photos. It looks charming up close, but textured nails can catch on tights, hair, and chunky knits if the lines are too tall. Keep the pattern neat and slightly raised, not bulky.
Difficulty: 4/5
5. White Marble with Silver or Gold Veins
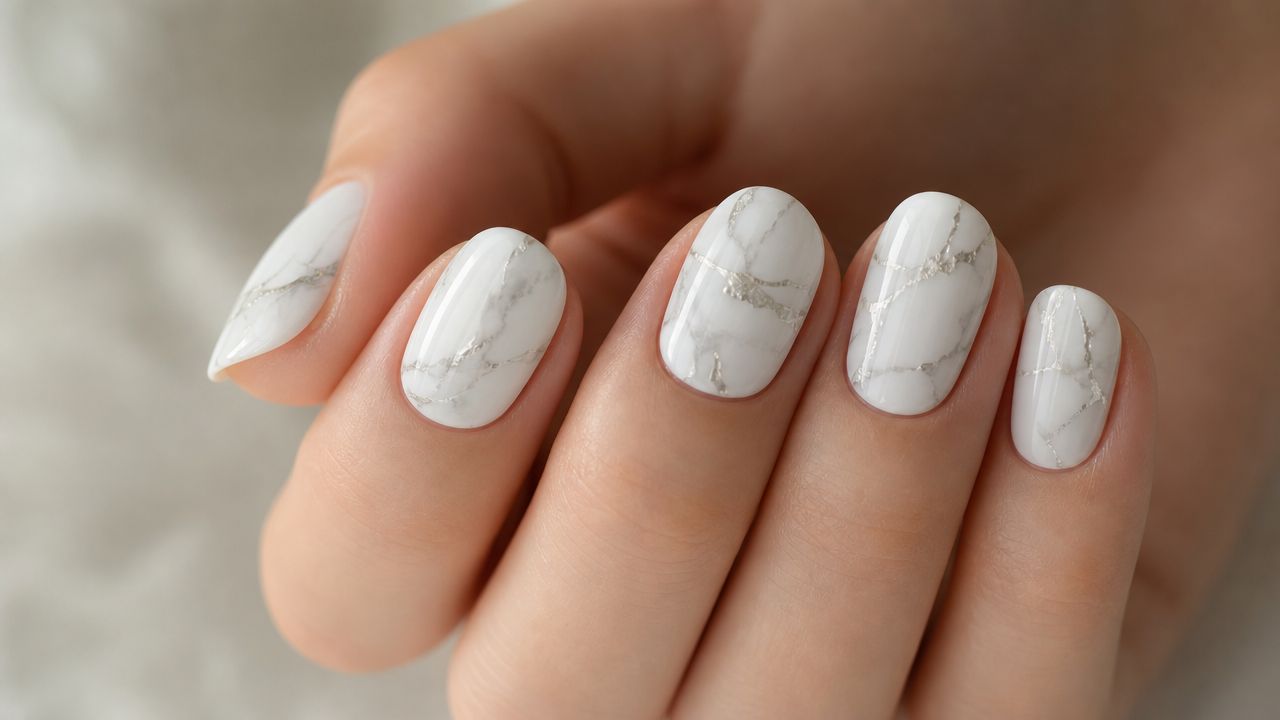
Marble nails look complicated, but they're mostly about restraint. The mistake I see most often is making the veins too dark, too thick, or too evenly spaced. Real marble is wispy and irregular. Your nail art should be too.
Start with a soft white like Essie Marshmallow or Zoya Snow White. For veining, use a very small amount of silver or gold polish thinned on a palette. Wet a detail brush slightly with top coat, pull a few crooked lines, then blur parts of them before they dry.
A better beginner method
If freehand marble feels intimidating, put a drop of white and a tiny drop of metallic polish on a silicone mat, swirl lightly with a toothpick, and pick up the pattern with a stamper or detail brush. You're aiming for suggestion, not perfect stone realism.
This design looks polished on office-friendly lengths and still feels festive enough for parties. Silver veins lean icy. Gold veins feel softer and more luxe. If your jewelry wardrobe is mostly yellow gold, choose gold here too so the whole look makes sense.
Difficulty: 3.5/5
6. Sugar Spun Glitter Effect
This is your holiday-party manicure. It's bright, sparkly, and far easier than hand-painted nail art. The finish looks like sugared frost when you layer white sparkle over a pale base, especially under tree lights.
Use a milky or opaque white underneath. Essie Blanc works if you want a stark base, while Olive & June HD gives a softer look. Then press on a textured white or iridescent glitter. China Glaze Fairy Dust over white can create a lighter sugar effect, while Orly Twinkle Twinkle gives more visible shimmer.
Make it look expensive
The trick is not to flood every nail with thick glitter chunks. Apply the sparkle in thin coats, concentrating a little more near the center and tips. If the glitter texture feels too rough, use one layer of glitter and two layers of glossy top coat instead of burying it under one thick coat.
- Best for: Holiday parties, vacation nails, short manicures that need visual impact.
- Less ideal for: Anyone who hates removal. Glitter takes work to soak off.
- Budget shortcut: Use one full glitter accent nail per hand and keep the rest glossy white.
A textured glitter manicure looks better when the shape is simple. Short oval or squoval keeps it chic.
Difficulty: 2/5
7. Pearly White Chrome Manicure
If you've been saving glazed, pearly, light-catching nails on your phone, this is the white Christmas version to try. It's sleek, minimal, and more forgiving than pure opaque white because the pearl finish distracts from tiny imperfections.
For the easiest at-home route, start with a milky white base like Essie Marshmallow or OPI Funny Bunny. Then add a pearl chrome powder if you use gel, or fake the look with a pearly top coat like Sally Hansen Miracle Gel Unicorn Top Coat over white polish if you don't.
Best budget path
Press-ons can be the cheapest way to get a convincing chrome finish without buying a lamp, no-wipe top coat, and powder separately. If you like comparing lower-cost nail options before you buy, browse these nail dupes and budget beauty picks.
There's another reason this look has become so popular. Available coverage around white Christmas nails mostly centers on motifs like snowflakes, bows, chrome, and frosty finishes, but there isn't solid neutral market or adoption data behind those ideas, only inspiration-led examples, as noted by The Pink Issue's discussion of white Christmas nails. In practice, chrome stands out because it gives a salon-looking result without detailed art.
Difficulty: 3/5 with chrome powder, 1.5/5 with a pearly topper
8. Minimalist White with a Single Dot
This is the manicure for people who want something festive-adjacent, not festive-obvious. It's a clean white manicure with one tiny dot near the cuticle or slightly off-center. Black looks graphic. Gold looks polished. Red gives the faintest holiday nod.
Go with a very smooth white for this one because there's nowhere to hide. Essie Blanc, Orly French Manicure White Tips, or Sally Hansen White On Time all work. Use a bobby pin or dotting tool for the accent.
Placement matters
Put the dot low and centered for the neatest effect. If it drifts too high, the design can start to look accidental. I prefer one dot on every nail for a uniform look, but one accent nail per hand is even easier if you're rushing.
- Use gold if: You want this to feel dressy.
- Use black if: You like modern, graphic nails year-round.
- Use red if: You want subtle Christmas energy without snowflakes or glitter.
This is also the best fix for a plain white manicure that feels unfinished. One tiny accent changes the whole mood without adding much time.
Difficulty: 1/5
9. White French Tips with a Silver Lining
A classic French manicure already makes sense for the holidays. Add a thin silver line under the white tip, and it suddenly feels winter-party ready. This one works especially well if you want something elegant that won't clash with velvet dresses, sequins, or chunky knits.
Use a sheer pink or milky nude base like Essie Ballet Slippers or OPI Bubble Bath. Paint the white tips with a striping brush, then trace just beneath the smile line with a fine silver glitter polish or liner. Keep that silver line thin. Too thick, and the whole manicure starts looking busy.
Where beginners should cheat
French tip guides, stickers, or even reinforcement labels from the office supply aisle can help you get a cleaner smile line. For the silver stripe, a detail brush gives more control than the bottle brush every time.
This is one of those white Christmas nail designs that flatters nearly everyone because the base stays soft and the holiday element lives in the accent. If you want more nail inspiration beyond seasonal looks, this beauty nails category is a useful rabbit hole.
Difficulty: 3/5
10. Milky White with Gold Flakes
Milky white with gold flakes is soft, glossy, and subtly festive. It doesn't scream Christmas, which is exactly why it works so well from December through January. If you like the expensive “your nails but better” look, this is probably your best pick.
Use a sheer milky base like OPI Funny Bunny, Essie Marshmallow, or Olive & June HD. Then place a few tiny gold flakes into the wet second coat or top coat. You want scattered shimmer, not full foil coverage.
How to keep it from looking messy
Tear larger foil pieces into much smaller fragments before they go on the nail. Concentrate them near one side or closer to the tip so the design feels intentional. Seal carefully with a glossy top coat, and if any edge sticks up, press it flat before the final layer.
White manicures look freshest when the cuticle area is clean. Spend the extra two minutes on cleanup. It changes the whole finish.
This design is also practical. Because the base is sheer, regrowth is less obvious than with stark opaque white. That makes it a smart choice for travel weeks when you don't want to think about touch-ups.
Difficulty: 2/5
Comparison of 10 White Christmas Nail Designs
| Design | 🔄 Implementation Complexity | ⚡ Speed / Efficiency | Resource Requirements | 📊 Expected Outcome | 💡 Ideal Use Cases & Key Advantages (⭐) |
|---|---|---|---|---|---|
| 1. Classic White with Silver Snowflakes | Beginner–Intermediate (stamping or freehand) | Moderate | Opaque white, silver metallic polish, stamping plate or thin brush, top coat, optional rhinestone | Elegant white base with delicate glossy silver snowflakes | Holiday parties to formal events; timeless, versatile look. ⭐⭐⭐⭐ |
| 2. Snowy White Ombré with Glitter Gradient | Beginner | Moderate | Sheer base, opaque white, silver glitter polish, makeup sponge, top coat | Frosted ombré with light-catching sparkle and dimension | Glam occasions and photos; high visual impact with simple tools. ⭐⭐⭐⭐ |
| 3. Modern Matte White with Gold Lines | Beginner–Intermediate (striping tape or hand-paint) | Quick | White polish, matte top coat, gold striping tape or thin brush | Velvety matte white with crisp metallic lines | Minimalist/modern settings; looks expensive and low-maintenance. ⭐⭐⭐⭐ |
| 4. Cozy "Sweater Weather" Knit Nails | Intermediate | Slow | White polish, dotting tool/brush, clear acrylic powder (or 3D gel) | Tactile 3D cable-knit texture with a cozy matte finish | Casual winter wear or accent nails; highly textural and seasonal. ⭐⭐⭐ |
| 5. White Marble with Silver or Gold Veins | Intermediate | Moderate | White base, grey/silver/gold polish, super-thin brush or stamper, optional gold leaf | Luxurious marble effect with delicate metallic veining, glossy finish | Elegant occasions; sophisticated stone-like aesthetic. ⭐⭐⭐⭐ |
| 6. "Sugar Spun" Glitter Effect | Beginner | Quick | White polish, fine iridescent glitter, fluffy brush to remove excess | Dense, textured crystalline sparkle (sandy feel) | Party-ready accent nails; maximum sparkle, DIY-friendly. ⭐⭐⭐ |
| 7. Pearly White Chrome Manicure | Intermediate (best with gel) | Moderate | Gel polish, no-wipe top coat, white pearl chrome powder, UV/LED lamp | High-shine, ethereal glazed-chrome finish | Trendy events and photos; mirror-like, modern finish. ⭐⭐⭐⭐ |
| 8. Minimalist White with a Single Dot | Beginner | Fast | Opaque white polish, dotting tool or bobby pin, accent polish, top coat | Clean opaque white with one precise colored dot | Everyday wear, minimalist style; effortless and versatile. ⭐⭐⭐⭐ |
| 9. White French Tips with a Silver Lining | Intermediate | Moderate | Sheer nude base, white tip polish or guides, silver liner/striping brush, top coat | Classic French with a thin glittering silver outline | Weddings and formal looks; classic with a subtle twist. ⭐⭐⭐⭐ |
| 10. "Milky" White with Gold Flakes | Beginner | Moderate | Milky sheer white polish, small gold foil flakes, tweezers, top coat | Soft, layered milky finish with suspended gold accents | Soft luxury and daytime elegance; dreamy, easy-to-layer effect. ⭐⭐⭐⭐ |
Your Perfect White Christmas Manicure Awaits
White Christmas nail designs have earned their place as a real seasonal style category, not just a passing niche idea. They've grown alongside the rise of holiday nail content and now cover a wide range of looks, from simple milky whites to more detailed chrome, shimmer, matte, and textured finishes, which is why they feel so wearable for different budgets and occasions. The good news for anyone doing their nails at home is that you don't need salon-level tools for most of them. You just need a white polish that self-levels well, a top coat that won't shrink, and a design choice that matches your patience level.
If your goal is the easiest win, go for the minimalist dot, the sugar-spun glitter effect, or the milky white with gold flakes. Those give you the most style for the least effort, and they're forgiving if your hands aren't perfectly steady. If you want something that looks more detailed, the snowflake nails, marble, and silver-lined French tips feel polished without being impossible. The knit sweater texture and true chrome manicure can look stunning, but they're better if you're willing to slow down or use press-ons and gel tools.
The biggest mistake with white polish is trying to rush it. White shows every streak, dent, and drag mark. Thin coats, extra drying time, and careful cleanup matter more here than they do with deeper shades. That's also why some of these designs work so well on a budget. Glitter, shimmer, pearl, and milky finishes help disguise the little flaws that stark flat white makes obvious.
If I had to recommend one all-around starting point, it would still be Essie Blanc. It's widely available, works across the most styles in this list, and gives you the opaque, crisp white base that makes white Christmas nail designs look intentional instead of chalky. If you prefer a softer finish, keep Essie Marshmallow or OPI Funny Bunny in mind for the milky and glazed looks.
Pick the design that matches your schedule, not just your saved inspiration photos. The best holiday manicure is the one you'll finish, wear comfortably, and still like three days later.
FAQ
Which white polish is best for white Christmas nail designs?
For a crisp opaque base, Essie Blanc is the strongest all-around pick in this list. For a softer, milkier look, Essie Marshmallow and OPI Funny Bunny are easier to use for sheer or glazed styles.
Are white Christmas nail designs hard to do at home?
Some are, some aren't. Minimalist dots, glitter gradients, and milky white nails are beginner-friendly. Sweater texture, marble, and chrome take more practice or better tools.
How do I stop white nail polish from looking streaky?
Use thin coats, let each coat dry properly, and don't overwork the brush. A ridge-filling base coat also helps if your nails aren't smooth.
What's the most budget-friendly design in this list?
Minimalist white with a single dot is probably the cheapest and fastest. You only need white polish, a dotting tool or bobby pin, and one accent shade.
Do white Christmas nail designs work on short nails?
Yes. In fact, several of the chicest options look great on short nails, especially snowflakes, minimalist dots, matte white with gold lines, and silver-lined French tips.
What's the best long-lasting option for holiday travel?
Milky white with gold flakes and glitter ombré tend to hide wear better than flat opaque white. Press-ons are also useful if you want a quick replacement option while traveling.
White Christmas nail designs don't have to be expensive, complicated, or salon-only. The best dupe-friendly starting point is still Essie Blanc because it gives you the clean, versatile white base that works for snowflakes, French tips, matte looks, and more. Whether you want something minimal or full holiday sparkle, these ten looks prove you can get a chic winter manicure at home without overspending.
If you love affordable beauty finds that still look polished and high-end, visit Finding Favourites for more smart dupes, practical nail ideas, and budget-friendly beauty picks that save you money without sacrificing style.