
Summer Nail Art Ideas: 10 Stunning Looks for 2026
You're standing in front of your nail kit with half a bottle of top coat left, a couple of drugstore polishes, and a summer event on the calendar that you cannot show up to with chipped, boring nails. That's exactly where summer nail art ideas earn their keep, because the best looks don't have to be complicated or expensive to feel polished. This guide keeps things practical, trend-aware, and budget-friendly, with 10 looks you can recreate at home, plus the smartest dupe-style swaps for each one.
This post may contain affiliate links, which means I may receive a commission if you purchase through your links, at no extra cost to you. Please read the disclosure policy for more information.
If you want a quick backdrop for the season, the trend data points in the same direction across search and social. Pinterest saw a 250% surge in searches for “’90s nail art” and a 175% rise in “fruity nails”, while cute strawberry nails climbed 250% and fruit themes like blueberry nail art and grapefruit nails rose 196% and 194% heading into summer, according to Glamour's summary of Pinterest's Summer 2024 Trend Report. Chrome also stayed loud, with NewBeauty reporting 83% more searches for chrome nails and 151 million TikTok views around the look, which explains why shiny finishes keep showing up in salon chairs and DIY carts alike. Those patterns matter because summer nails are really about bright motifs, reflective finishes, and easy-to-wear updates to familiar shapes, not one single dominant manicure style. top beach bags this summer
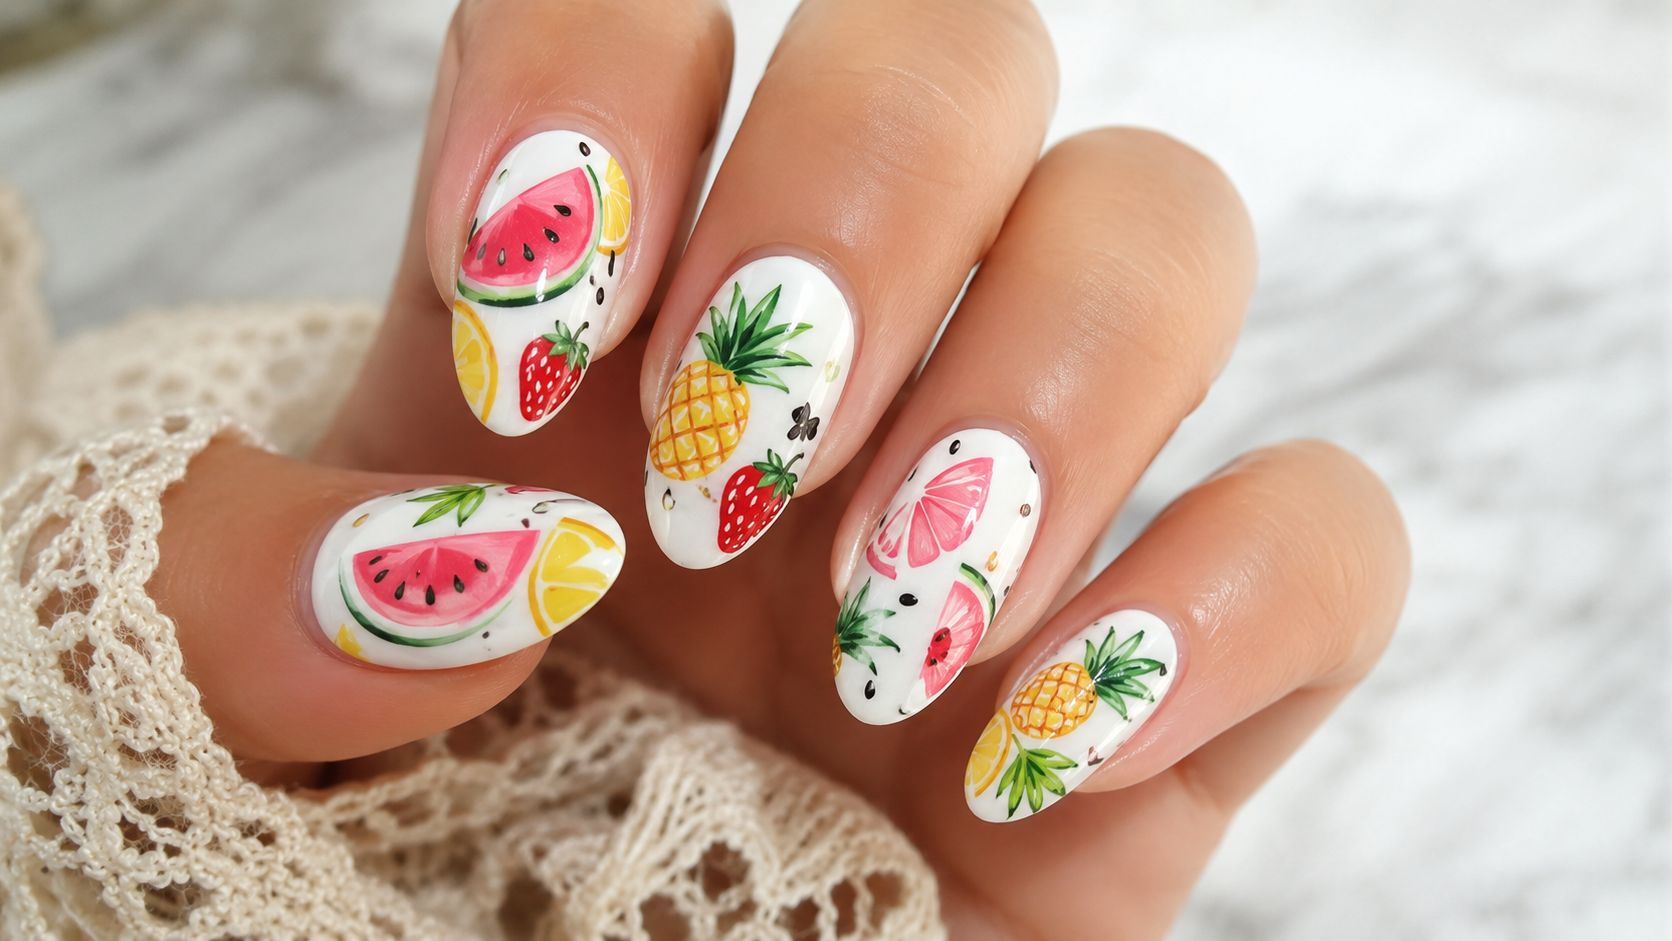
1. Tropical Fruit Nail Art
Fruit nails work because they read instantly from a distance, even on short nails. A white base makes the colors pop, and a simple dotting tool or toothpick is enough for seeds, citrus centers, and tiny highlights. I'd keep the palette tight, then let one accent nail do the heavy lifting, so the set looks intentional instead of busy.
How to build it without overthinking it
Start with two coats of white or milky nude, then map out the fruit shapes lightly before filling them in. Watermelon slices need pink, green, and a few black seed dots, while strawberries look best when you keep the stem tiny and the seed details sparse. Pineapples are easier than they look if you use a geometric yellow body and just hint at the leaf crown.
Practical rule: put the most detailed fruit on one or two nails, then repeat a simpler motif on the others. That keeps the manicure wearable and speeds up cleanup.
The quickest budget upgrade is to use cheaper color polish and spend on the tools that control the finish. A steady liner brush, a good top coat, and a clean white base do more for the result than paying extra for every shade. If you want to compare shortcuts before you buy, shop Finding Favourites for low-cost nail extras that make the detail work easier.
Dupe guide for tropical fruit nails
| What you need | Luxury pick | Drugstore or budget pick | Price range | Performance note |
|---|---|---|---|---|
| White base polish | Olive & June white cream shade | Wet n Wild white polish | Budget to mid-range | A smoother white helps fruit colors stand out fast. |
| Bright fruit colors | Orly or China Glaze brights | Sinful Colors brights | Budget to mid-range | Drugstore colors work well if you build in thin coats. |
| Fine detail brush | Professional liner brush | Basic nail art brush set | Budget to mid-range | A thinner brush gives cleaner seeds, stems, and rind lines. |
| Dotting tool | Stainless steel dotting tool set | Toothpick or bobby pin tip | Very low cost | A real tool makes seed dots more even, but a household swap still works. |
| Gloss top coat | Salon-style high-shine top coat | Fast-dry clear top coat | Budget to mid-range | A strong top coat helps fruit art look freshly painted instead of flat. |
For affordable polish swaps, think in layers. Use Wet n Wild or Sinful Colors for the base shades, then spend a little more on one good glossy top coat to lock in the detail work. If you like to practice first, paint the design on nail wheels before committing to your hands, because fruit art looks cute only when the edges stay crisp.
You can pair the look with citrus-forward accessories for a full summer mood, and if you're building a warm-weather outfit around it, shop citrus aromatherapy sets is an easy way to keep the theme going.
The main trade-off here is time. The more fruit you add, the more cleanup you'll need, so keep a cotton swab and remover nearby and don't chase perfect symmetry. This is the look that rewards clean, cheerful execution more than precision-heavy art.
2. Ocean Wave and Beach-Inspired Nails
Ocean nails are the easiest way to make a manicure feel like a vacation without using literal palm trees on every finger. Blue-to-white ombre, sandy neutrals, and thin wave lines give you that beach energy fast, especially when you combine a soft fade with one textured accent nail. A makeup sponge helps a lot here, because the transition looks smoother than brush blending on its own.
Build the shoreline, not just the color
Start with a sky-blue or turquoise base, then sponge white or pale blue into the tip area to fake distance and foam. After that dries, add wave curves with a thin nail art brush or liner brush. If you want more dimension, press a translucent glitter layer over the blue so the set catches light like water.
A sand-colored accent nail works best when you keep it quiet, maybe with a tiny seashell sticker or a soft matte top coat. That balance matters, because too many beach details can push the set into costume territory. A single metallic shell sticker often says more than a whole cluster of charms.
Keep the finish mix simple. One glossy ocean nail, one sandy nail, and one glitter accent usually look more expensive than trying to fill every finger with a different effect.
For the base, budget-friendly brands like Orly or China Glaze are solid if you want a clean blue or turquoise without paying salon pricing. Spend your upgrade money on a glitter top coat, because that's the part everyone will notice in sunlight. If you want a real-world styling cue, this is the manicure that works with linen sets, slides, and a beach tote without competing for attention.
Dupe guide for ocean wave nails
The trade-off is durability. Glitter hides minor wear better than flat polish, but ombre edges can chip if you skip top coat. Seal the free edge carefully, especially if you're packing beach bags and fishing around for sunscreen all day.
3. Neon and Bright Gradient Nails
A neon manicure has a very specific job, it has to look bright in daylight and still read clean at arm's length. A hot pink to neon yellow fade does that fast, and a neon orange and lime block design gives the same summer punch without needing complicated art. Thin layers matter here, because thick coats make neon polish look chalky and let the base color peek through in the wrong places.
Make the color work, not fight you
Thin coats beat one heavy layer every time with neon polish. A sponge gradient usually gives a smoother fade than a brush gradient, and it is easier to control when you are blending electric pink into orange or yellow. If you want geometric shapes, let the first layer dry fully before you tape off the next section, otherwise the edges lift and the whole design loses its clean lines.
Budget-friendly polish choices like Essie and Sinful Colors are reliable starting points if you want neons that still feel wearable. They are usually steadier than mystery-bright bottles that streak after one swipe, which matters more than the brand name when you are trying to get an even finish at home. A strong top coat matters too, because neon shades can look flat as soon as the surface starts to chip.
For the dupe side of the look, the goal is not to copy every salon product. Use a bright base polish, a makeup sponge, and a glossy top coat first, then spend extra only where it changes the result.
| Neon salon step | Affordable dupe option | Why it works | Trade-off |
|---|---|---|---|
| Bright neon polish | Essie or Sinful Colors neon shade | Gives the same high-impact color without a salon price tag | Some shades need a third thin coat |
| Smooth gradient finish | Makeup sponge | Blends the fade better than brushing color straight on | Uses a little more polish |
| Sharp geometric edge | Nail tape or guide stickers | Helps keep the design clean and modern | Tape can lift if the base is still tacky |
| Glossy salon finish | Budget gel-look top coat | Adds shine and helps the neon stay vivid | Needs careful sealing at the free edge |
If you are doing this at home, keep the rest of the manicure simple. A single accent nail with a white geometric shape can make the whole set look cleaner and more modern. I would also avoid mixing too many neon shades on one hand unless you already know how to keep the finish balanced, because the result can turn busy fast.
If you want more budget ideas that still feel current, visit Finding Favourites for affordable polish and tool picks.
Dupe guide for neon gradient nails
This look works best for weekends, concerts, and pool days, but it is less forgiving than a sheer manicure. If your application is uneven, the neons show it immediately, so practice on a wheel first and keep your coats thin.
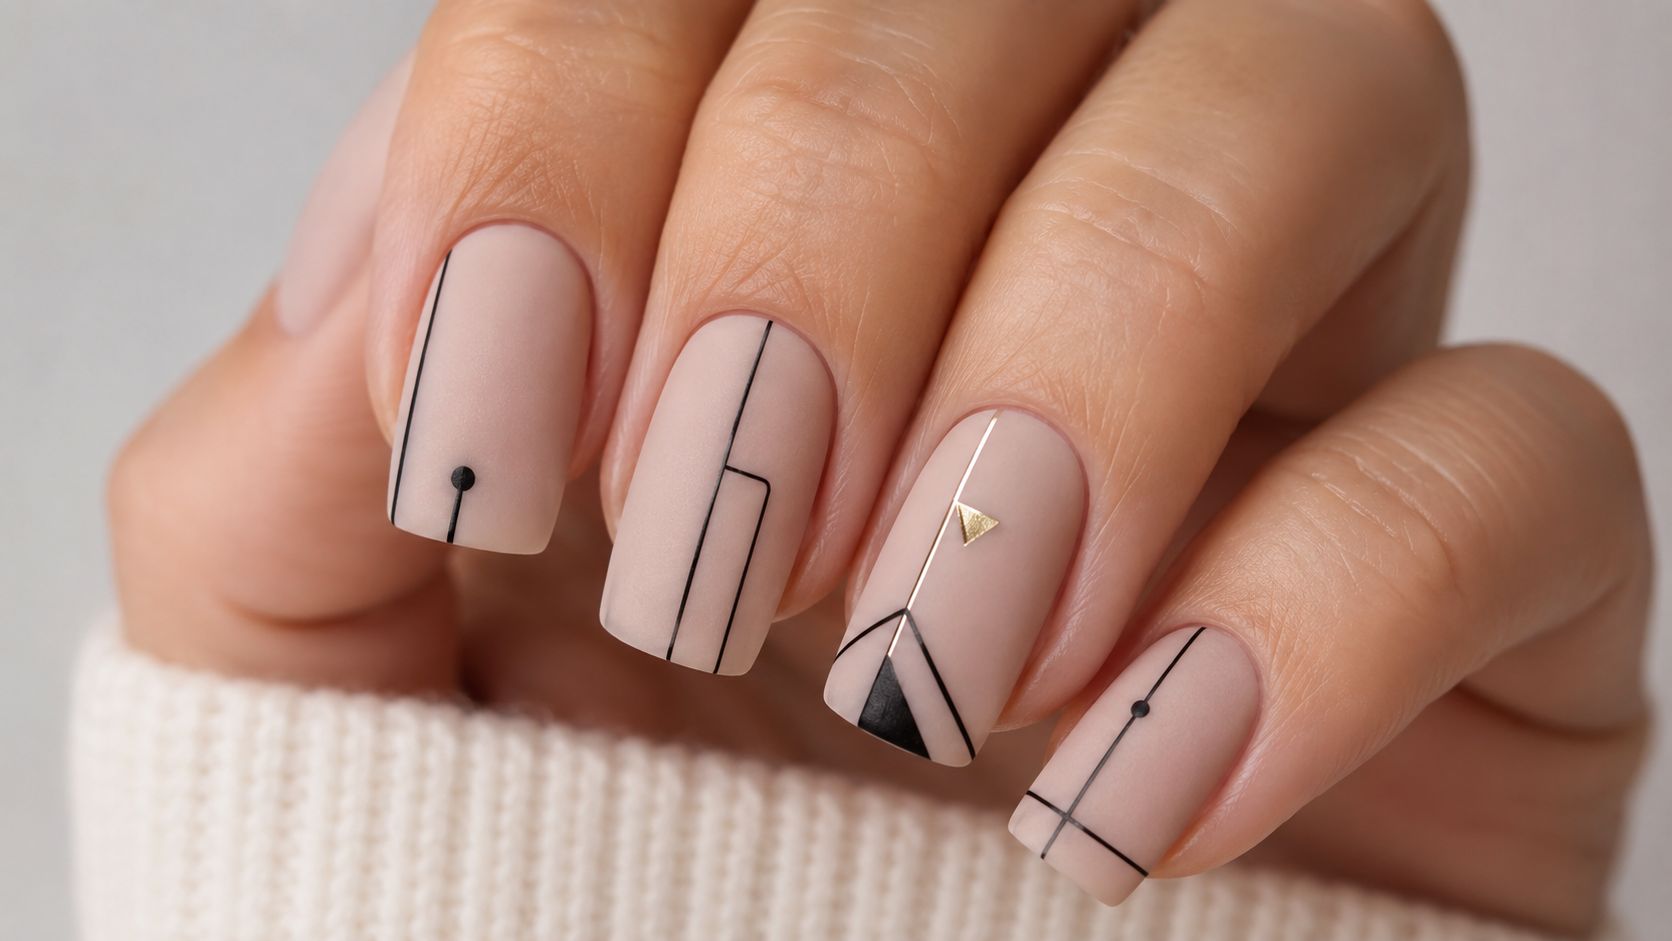
4. Minimalist Line Art and Geometric Nails
Minimalist nail art is the answer when you want something stylish that still looks good after a week of typing, dishwashing, and sunscreen reapplication. A single black line on a nude base, gold triangles on white, or a few asymmetrical blocks can look very modern without needing advanced brush control. This is also one of the best options for short nails, because the design doesn't depend on long free edges.
Precision matters more than pigment
Apply your lines only after the base coat is fully dry, otherwise the liner drags and the whole design gets fuzzy. A thin liner brush or nail art pen gives you the best shot at straight edges, but tape or guide stickers can save the day if your hand isn't steady. The trick is to keep the design sparse, because every extra shape makes the spacing harder to get right.
Practical rule: if the line looks wobbly on the first finger, stop and reset. Chasing perfection by adding more paint usually makes the whole manicure look heavier.
Use one good liner and pair it with affordable base polish. That keeps the set looking premium without wasting money on specialty bottles that you won't use often. On a real summer schedule, this is the manicure that holds up to dinners, work days, and casual weekends without screaming for attention.
Dupe guide for minimalist line art
The downside is that minimalist designs expose mistakes quickly. If your base shade is streaky or your lines are too thick, the whole manicure starts to look clumsy, so keep the palette restrained and the brushwork deliberate.
5. Glitter Ombre and Sparkle Gradient Nails
Glitter ombre is the easiest way to make a manicure look expensive with very little skill. A nude-to-gold fade, silver glitter on pale pink, or clear sparkle that concentrates at the tips catches sunlight in a way flat polish never will. The best part is that this design can be as subtle or as dramatic as you want, depending on how dense you place the glitter.
Build the fade, then smooth it
Start with your base color, then press glitter into the tacky layer instead of trying to brush it on like paint. If you want a budget route, loose glitter works fine when packed into the tip area with a sponge or fingertip, but a ready-made glitter polish is faster if you're in a hurry. Dense tips and sparse cuticle areas create the gradient effect that makes the set feel intentional.
Wet n Wild and Sinful Colors are useful places to look if you want glitter polish without spending much. Mix fine and chunky glitters if you want depth, but don't go overboard, because too many different particle sizes can make removal annoying. A good top coat is essential here, since glitter can feel rough until it's sealed.
If you're doing this for a party, do a single accent hand instead of every finger. That gives you the sparkle payoff without spending forever smoothing and sealing each nail. It also helps the manicure look more balanced next to rings and bracelets.
Dupe guide for glitter ombre nails
The trade-off is removal. Glitter manicures are gorgeous, but they take more patience to take off cleanly, so plan for that before you commit. If you hate long soak-off sessions, keep the glitter concentrated at the tips instead of covering the whole nail.
6. Floral and Botanical Nail Art
Floral nails stay popular because they read as summer without feeling overly themed. Tiny wildflowers, daisy chains, leaf sprigs, and soft watercolor petals all give the manicure a seasonal look, even if the rest of the set stays quiet. A little asymmetry helps here, because hand-painted petals often look better when they do not match nail to nail.
Go small, then add one accent
A dotting tool makes flower petals fast to place, especially for daisies and tight clustered blooms. For leaves and stems, a fine detail brush gives cleaner lines, since those shapes need control instead of a thicker blob of color. If painting every flower by hand feels slow, combine a few hand-painted details with floral stickers so the set still looks custom.
Using Essie for your base colors is a smart choice if you want soft whites, pinks, and pastels that go on evenly. The flowers can be cheaper than the base, because tiny details are where stickers, dots, and short strokes do the heavy lifting. If you want more dupe ideas, find more dupes before you buy specialty art tools. Practice on nail wheels first if you are trying a more botanical look, since leaf placement can crowd the nail fast.
| Floral nail need | High-end option | Budget dupe | Best trade-off |
|---|---|---|---|
| Soft sheer base | Essie pastel or milky shades | Affordable pastel polish from Wet n Wild or Sinful Colors | High-end formulas level out more easily, while budget shades can need an extra thin coat |
| Petal detail | Salon detail brush set | Fine liner brush from a discount beauty set | A better brush gives cleaner stems, but a cheap brush works if you keep the strokes short |
| Flower centers | Precision dotting tool | Bobby pin tip or toothpick | The pro tool is more consistent, but a household tool works for tiny accents |
| Small blooms | Hand-painted art gel | Floral nail stickers or decals | Paint looks more custom, but stickers save time and reduce mistakes |
| Final shine | High-gloss top coat | Quick-dry clear top coat | A stronger top coat smooths texture, while a budget version still seals the design |
You will also see this theme paired with spring and early-summer wardrobes, but it works just as well with a plain tee and denim shorts. The manicure becomes the accessory, which is an easy way to make floral nails feel modern instead of overly precious.
Dupe guide for floral nails
The main trade-off is time. Botanical art can get fiddly, so keep the flowers small and let negative space do part of the work. That keeps the manicure fresh instead of crowded, and it also makes a lower-cost set look intentional instead of busy.
7. Tie-Dye and Marble Swirl Nails
Swirl nails are the easiest way to make color feel playful without committing to tiny artwork. Tie-dye pink, purple, and white, or a blue-and-green marble pattern, gives you that retro summer feeling with less precision than florals or line art. The look works best when you don't overblend, because you still want the colors to show.
Blend fast, then stop
Pick contrasting colors so the design reads once it's dry. If you're using a sponge or plastic wrap to blend, work quickly before the polish sets, then stop once the swirl looks soft enough. Thin layers let you add more variation without turning the nail into a muddy mix.
The biggest mistake is overmixing. You want movement, not a single brownish blur, so leave some areas more saturated than others. That unevenness is what makes the design feel alive and a little bit psychedelic.
A clear top coat ties everything together and helps the colors look more dimensional. If you like a softer version, pastel pink and coral swirls are friendlier than full rainbow chaos and still feel seasonal. On short nails, keep the swirl slightly larger so the pattern doesn't disappear.
Swirls are forgiving, but not infinite. If the first pass looks interesting, leave it alone and seal it.
Dupe guide for tie-dye and marble nails
The trade-off is control. This design rewards spontaneity, which is great if you hate perfection but not so great if you want symmetry. That's why swirl nails work best when you lean into the handmade look instead of fighting it.
8. Chrome and Metallic Mirror Nails
Chrome nails are still one of the most visible summer finishes because they look dramatic with almost no extra artwork. Full silver mirror nails, rose gold French tips, or a holographic fade can turn a plain manicure into something that catches every bit of sunlight. That shine is why chrome keeps showing up in trend roundups and salon requests.
Powder makes the difference
If you want the best result, start with a gel base coat so the powder has something to grip. Then apply chrome powder with a damp sponge in circular motions until the surface turns reflective. Once it looks even, seal it with clear gel or a regular top coat so the finish lasts.
A lot of budget chrome powder sets are easy to find, and the sweet spot is usually around the low-price range you'd expect from Amazon listings. The exact bottle matters less than the application, because an uneven rub will make even expensive powder look cheap. Practice the motion a few times before you use it for an event.
Practical rule: chrome looks best when the rest of the nail is simple. A single mirror accent can look more expensive than a busy hand with too many competing textures.
You can pair chrome with any base polish, which is why it's such a strong dupe-style option. A neutral underneath keeps it wearable, while a bright base pushes it into party territory. If you're on a budget, this is one of the highest-impact finishes you can buy without moving into salon pricing.
Dupe guide for chrome nails
The trade-off is technique. Chrome can look patchy if your base is uneven or your top coat is too thick, so expect a learning curve. Once you get it right, though, the payoff is huge.
9. Negative Space and Cut-Out Designs
Negative space manicures feel polished because they leave part of the nail bare on purpose. Half-moons, geometric cutouts, alternating stripes, and circular bare spots create a modern look without needing a lot of polish. They also make more sense for short nails than crowded art, because the empty space keeps the design airy.
Tape is your best friend here
Use painter's tape or nail art stickers to block off the bare areas before you paint. Press the tape down firmly, apply the polish, then remove it before the layer fully dries so the edge stays crisp. That timing matters more than almost anything else in this design.
A single good nude or neutral polish is all you really need for the base. After that, choose one contrast color and keep the shapes simple. If the design starts to feel too busy, cut it back, because negative space only works when the empty areas still read clearly.
This is a smart look for people who want something creative but low-maintenance. Outgrowth is less noticeable because the bare sections already create visual breaks, which makes the manicure feel wearable for longer. It's also a good companion for rings, since the clean geometry frames jewelry nicely.
Dupe guide for negative space nails
The main downside is patience. If you rush the tape removal, edges can peel or blur, and that ruins the whole effect. Take the extra minute to press and lift cleanly, and the design looks much more intentional.
10. Colorful French Tips and Reverse French Nails
Colorful French nails are the easiest way to make a classic feel current. Swap the white tip for neon yellow, hot pink, gold, or even a rainbow fade, and the whole manicure suddenly feels like summer instead of office standard. Reverse French versions do the same job from the cuticle side, which is great if you want something a little less expected.
Keep the curve clean
Use nail guides or tape if you want the tip line to stay even. A thin, precise brush gives you better control on the smile line than a thick applicator, especially with brighter colors. If you're experimenting for the first time, practice the curve on nail wheels before moving to real nails.
Essie, Sally Hansen, and Sinful Colors all make sense as budget bases and tip colors when you want dependable bottles that are easy to find in the US. The color combination matters more than the brand name, so choose shades that contrast clearly enough to stand out. A pale pink base with gold ombre tips looks softer, while a nude base with neon yellow tips feels sharper and louder.
The smartest French manicure move is usually the simplest one. One clean tip color beats three competing accents every time.
This is the dupe-friendly design I'd recommend most if you want the best balance of ease, wearability, and style. It works on short nails, grows out gracefully, and doesn't require a ton of precision to look good from arm's length. That's why it's the strongest everyday summer option in the whole lineup.
Dupe guide for colorful French tips
The trade-off is that bright tip colors can emphasize uneven lines if you rush. Stick with one bold hue and one soft base, and the manicure looks intentional instead of loud for the wrong reasons.
10 Summer Nail Art Styles Compared
| Design | Implementation complexity | Resource requirements | Expected outcomes | Ideal use cases | Key advantages |
|---|---|---|---|---|---|
| Tropical Fruit Nail Art | Medium–High (hand-paint or stamp; steady hand) | Multiple bright polishes, dotting tool/toothpick, top coat | Playful, vibrant, photogenic | Summer outings, vacations, social media content | Eye-catching, budget-friendly dupes, DIY possible |
| Ocean Wave and Beach-Inspired Nails | Medium (ombre blending, wave lines) | Sponges, liner brush, shimmer/glitter polishes | Calming, beachy aesthetic | Resort wear, summer events, everyday beach looks | Versatile skill levels, timeless summer trend |
| Neon and Bright Gradient Nails | Low–Medium (sponge gradients) | High-pigment neon polishes, base/top coat, sponge | Bold, statement-making | Festivals, parties, bold fashion moments | Affordable neons, easy gradient technique |
| Minimalist Line Art and Geometric Nails | Medium (precise line work) | Few neutral polishes, liner brush or nail pen | Sophisticated, versatile, clean | Professional settings, minimalist street style | Low polish count, timeless and adaptable |
| Glitter Ombre and Sparkle Gradient Nails | Low–Medium (glitter placement) | Glitter polishes or loose glitter, top coat | Luxurious, high-shine sparkle | Parties, weddings, special occasions | Glam look on a budget, forgiving application |
| Floral and Botanical Nail Art | Medium–High (hand-painted florals) | Multiple pastel/vibrant polishes, fine brushes or stickers | Romantic, elegant | Weddings, spring/summer events, bridal looks | Timeless, can combine DIY stickers with painted details |
| Tie-Dye and Marble Swirl Nails | Medium (swirl/blend technique) | Several polishes, sponge/plastic wrap or brush | Unique, organic each-nail designs | Festivals, retro looks, casual creative styles | Forgiving technique, highly customizable |
| Chrome and Metallic Mirror Nails | High (powder rubbing, gel preferred) | Chrome powders, gel/base coat, applicator tool | Mirror-like, high-impact luxury finish | Nightlife, editorial shoots, social media | Salon-quality appearance affordably, very photogenic |
| Negative Space and Cut-Out Designs | Medium (tape/guides for clean edges) | Painter's tape or stickers, minimal polishes | Modern, clean, architectural look | Professional settings, minimalist fashion | Minimal polish use, modern and sophisticated |
| Colorful French Tips & Reverse French | Low–Medium (precise tip lines) | Tip guides/tape, contrasting polishes, top coat | Updated classic, neat and wearable | Casual and formal summer events | Easier upkeep than intricate art, flattering on many shapes |
Your Perfect Summer Manicure Awaits
These 10 summer nail art ideas give you a full range of moods, from fruit-bright and beachy to sleek, metallic, and minimalist. The best part is that none of them require a luxury price tag to look pulled together, especially when you lean on smart swaps like drugstore brights, basic tools, and one great top coat. Summer nail art works best when it feels fun but still wearable, which is why simple techniques like dotting tools, tape, sponges, and clean tip lines show up again and again in the most practical looks.
If you want the easiest place to start, Colorful French Tips are the strongest dupe-friendly choice. They modernize a classic, work on short or long nails, and let you use affordable base-and-tip combinations without a lot of cleanup. They also wear well in real life, which matters when you're juggling plans, heat, and a calendar full of summer events.
The other big advantage of this list is flexibility. You can use fruit art for weekend trips, chrome for nights out, floral designs for a softer finish, and negative space or minimalist line art for days when you want something polished but low-effort. That mix makes it easier to rotate styles instead of feeling stuck with one look all season.
Backlink: browse ArtNaturals blog
Finding Favourites helps you find affordable beauty swaps that still feel polished and worth wearing, and that same approach works perfectly for summer nail art. If you want more budget-friendly beauty ideas with clear product guidance and smart alternatives, visit Finding Favourites and keep building looks you love without overspending.